Whitetail hunting can be tough.
Once upon a time, I read an article in a hunting magazine about making sure your deer is hit where you think it is, before you trot off through the woods tracking it. A couple of events from the author's bowhunting experience had demonstrated that the ol' eyeball can fool you into thinking the hit landed somewhere other than where it did.
Several times, the author suggested noting the deer's "body language" at the time of the hit, to help determine where it was hit... but he didn't give any examples or try to educate his readers on what to look for.
Thinking about it, I've rarely (if ever) seen tips in print to help hunters determine where they hit their deer via its actions. So, here goes!
The ultimate hit puts a deer down immediately, leaving no guesswork about whether or not to start tracking now or later. Most of the deer I've shot have dropped where they stood, or have fallen and died within eyesight. This isn't always the case, so it's nice to be able to have an idea where you hit your critter. This is sometimes crucial, as a poorly hit deer can run for miles if pushed too hard by trackers bent on its recovery, and may be lost in the process.
Gutshot deer will usually "hump up;" they'll arch their back, and do a sort of a stiff-legged trot.
I heard this from someone years ago, and found it to be true early in my hunting career when I failed to "pick a spot" to aim at, and instead shot at the entire deer... never a good idea, hunting equipment and a mistake I strive to avoid repeating. In my case, the deer went only about 75 yards or so and stopped, at which time I shot him again and he fell dead.
Had it come to tracking him, I would have known to wait before tracking, since the arched back and stiff-legged gait told me where I'd hit him. A gutshot deer can often live for a long time before dying, and if pushed by trackers may easily be lost.
Deer hit through the lungs will often kick their heels like a mule. I've seen it, and I'll swear to it.
The first time I saw this happen was on a muzzleloader hunt, years ago. When I shot the six-point buck broadside through both lungs, he kicked his heels straight back and started running. The thick woods prevented me from seeing very much of the deer as it fled, but it appeared to be slowing as it left my view.
I later found that it had run about sixty-five yards before stopping in front of my Dad, who was about to shoot it again when the buck fell, my .45 caliber maxi-ball having done its job.
Another instance of this occurred in the Ocala National Forest. When I shot that buck through the lungs, he kicked his heels up so high, I thought he was going to do a somersault. He crashed through the brush for 50 yards or so, then died.
Lung-shot deer won't always kick their heels, but in my experience they will always run before they die, and they may even run away "flag up" (see below). They usually don't travel far before dying quickly, and can usually be recovered within the hour.
Busting a Myth
There is a campfire myth that says if you shoot at a deer and the deer runs away "flag up" (with its tail held up high), then you missed the deer. This is not true! On more than one occasion, I have known well-hit deer to run away with flag up at the shot, looking for all the world as if they are perfectly healthy.
A couple examples: One deer was hit a quartering shot through the lungs with a 44 magnum, and another was shot broadside through both lungs with a 308 Win. Both deer ran away immediately with tails held high,rifle scope and both died soon thereafter. One of them ran about 80 yards, and the other went 150 or more, down a steep hillside. Each was blood-trailed and recovered, though at first we thought we may have missed the deer... and these are not the only instances of this that I've seen.
So next time you shoot at a deer and it runs away with its long white tail waving good-bye, follow up and search for blood, and for your deer.
Which Way Did he Go?
A hit deer that runs without any jumping or bucking or other acrobatics will usually run in the direction it was facing when the shot was fired, even if that means running uphill. This is not always the case, though.
I once shot a whitetail doe broadside with a good heart/lung shot, and she turned and ran away, turning to the left as she went. I found no blood within the first 20 yards or so, but I eventually found a good blood trail and recovered her without much trouble. So be sure to always follow up and look for blood, no matter what the deer did when you fired.
Heart Shots
I have never aimed specifically for a deer's heart; in my opinion, it's too small and too low a target to count on. I have been told that a heart-shot deer will sometimes rear up on its hind legs, but I know they'll often just drop or run, as well, giving no indication of a hit, and sometimes not even bleeding.
Most deer shot through the heart won't go far, and will die quickly.
Take Care!
Whatever the case, be sure of the shot before you take it. Don't take a shot you don't think you can make. When you shoot at a deer, follow through and find it if you hit it, and take it home! Give it a couple of hours if you're not sure of the hit, or if you know it was a poor hit, and then track it down. Take a buddy or two with you to help out... having more eyeballs out there can often make a big difference. Don't give up, and pray often for guidance. It's always worked for me!
By: Russ Chastain
2011年2月20日星期日
Tips to Finding a Good Horse Riding Instructor
Learning how to ride a horse correctly necessitates that you take up horse riding lessons. You may be able to learn on your own, following all the tips and guidelines in books and magazines, but only a riding instructor can diagnose faulty form or give you hints on how to make your ride smoother and better. Whether you want to learn to ride a horse in order to compete or just to learn how to ride a horse without falling, investing in riding lessons is always a good idea. Here are some tips to finding a good horse riding instructor:
1. Look for an instructor who can teach. This might seem obvious but you'd be surprised at the number of riding equipments teachers who do not have the patience to closely scrutinize your form or cannot wait to advance you until you are ready. Just because a riding instructor used to be the winning jockey of a graded 1 stakes race doesn't automatically make him a good riding coach.
2. Check the number of clients an instructor has under him or her. Having many students speak of his quality (usually) as a teacher. Reputation for expertise easily gets around and a very good instructor will come highly recommended compared to mediocre ones.
3. Visit the stable to see how well it is maintained or run. It should be clean and not run-down. The horses should be healthy and their stables secured. The whole area should be safe.
4. Ask if the horses are well-trained. The instructor should have horses that are taught to handle new riders well.
5. Ask for certification, if it is required in your area. An instructor certified by an equestrian federation or jockey club in your state is always a good gauge of the technical knowledge of the instructor.
6. Ask for recommendations from friends who have taken lessons before. They will always have a thing or two to say about particular instructors and are good sources of information regarding an instructor's personality and teaching style.
7. Observe how lessons are conducted when you visit the stable. This will generally give you a pretty good idea if the instructor is who you're looking for.
Keep in mind that you'll be paying the riding instructor to teach you. He or she should listen to your needs and accommodate requests for as long as they are within the bounds of reason. However, he or she should be firm enough to refuse your requests if they will not improve your riding skills.
By Kevin Hutto
2011年2月17日星期四
Staying Safe Around Horses
If you're a horse lover, a horse racing aficionado or even if you simply like to spend some time around horses, it's always a good idea to take the cautious approach. Equines may generally be peaceful animals, but with certain stimuli around their environment, they can sometimes act in ways that could endanger the lives of people around them. They are as strong as they graceful and fast as they are beautiful and as such, should be respected. It's always better to keep this power in mind and observe a few general principles when being around horses.
For starters, if you're meeting a horse riding for the first time (such as when you're introduced to it for a riding lesson), stay about 45 degrees from the shoulder so you reduce chances of getting kicked. Even if the instructor assures you that a horse is gentle, there's really no way of knowing how he'll react to the sight or smell of you. Thus, it's best to stay at this angle so you don't get struck in case a horse doesn't like you for one reason or another. Together with this, always observe the age-old advice of never turning your back on the horse.
In tying your horse, always observe a few safety precautions. Never tie the equine by his reins since there is always a risk of injury to his head, neck or mouth when he pulls back. Moreover, make sure that you tie your horse to a safe and secure place. Old and run-down fences are no places to tie a horse in since they can easily break them and drag them all over the place. When securing your horse, tie a slip-knot.
When you have to walk behind your horse (although this is not generally a good idea), always make sure that the horse knows you are there. Put your hand on the horse's back so he won't strike at you.
Finally, you might want to consider your outfit when riding. Wear riding breeches for English riding and jeans for Western riding. And while you might feel like a cowboy straight out of a Hollywood movie by wearing metal-toed boots, avoid the urge to. In the event that a horse steps on your foot, its weight is strong enough to pinch the metal down your toes and cause you extreme pain. Ouch!
Horses are awesome animals. But you can't let your guard around them. Stay safe!
by Kevin Hutto
Which Scope Should I Buy For my Husband's (or my) Hunting Rifle?
When buying a scope for a deer hunting rifle, you want to get the best you can afford. I strongly recommend against buying a junk scope, by which I mean just about any scope that sells new for less than $120 or so - and even at that low price range one should be wary. There are plenty of scopes that sell for $30-$40, but I wouldn't put them on anything more than a squirrel rifle.
Answer: What Magnification? By far, the most common scope used on hunting rifles is 3x-9x, which means that it magnifies about 3 times at the low end of adjustment, up to 9 times at the high end. A 40mm objective lens is plenty big, and that's what I prefer on my own hunting rifles. So for the purposes of this discussion, I'll stick with the most popular scope there is: 3x-9x, 40mm.
What Brands are Good?
Well, there are plenty of them to choose from. I find myself gravitating towards Sightron at the low end of the price scale, now that I have tried a couple, and liked them. The high end, for me, would be Leupold (excluding their cheaper Rifleman series), although there are others that cost more and offer better optics. For my needs, the improvement in quality doesn't justify their high prices.
What's it Going to Cost?
Often, it comes down to how much you want to spend. I have some very good scopes, and I have some junky ones. The cheapest good one I own is a Sightron S1 (I now own three of them, all on centerfire hunting rifles). Before I discovered this brand I bought a couple of Nikon scopes in the $200 range and a Burris for a little more, and I'm pleased with them... but the $130 Sightron gives me about the same performance, and offers considerable savings.
Gloss or matte finish?
I often use matte scopes because most of my guns have matte finishes, and I don't want my gun shining like a new dime when I head into the woods. If you enjoy the cosmetics of your rifle as much as its performance, then a more polished gun would look better with a gloss scope on it. I did put a glossy Sightron S1 on Dad's old Browning BAR 30-06 (and took a doe with a 100-yard head shot the first time I took it to the woods).
Which Reticle/Crosshair?
When it comes to choosing a crosshair or reticle (that's what you see and use for aiming - usually a cross - when you look through the scope), it's hard to beat the tried-and-true cross with lines that are thicker towards the outer ends of the "hairs" and thinner in the center, where they cross. Different manufacturers call them by different names, but usually they will be named "plex" or some variation thereof.
Conclusion
All in all, you can get a good quality scope without breaking the bank, if you're careful. 3x-9x is a good range of magnification, and scopes in that range are readily available and often cost less than others. Go with a 40mm objective lens and you will have all the light you need and will still be able to mount the scope nice and low, as it should be.
Buy a scope that's good enough so you can trust it to perform when you need it, where you need it. The hunting woods isn't exactly a gentle environment, and that means our scopes should be able to take some punishment. Make your choice accordingly - the trophy of a lifetime may depend on it!
by Russ Chastain
2011年2月16日星期三
What Is The Best Way To Saddle A Horse?
The best way to saddle a horse is to use a western style thick felt pad, felt being good for use any time you have got a horse that may be getting into a sweaty situation. This will definitely help wick that off. But since you would also have a little bit of color in your day today, go ahead and add one of these blue Navajo blankets just to pit some fun and color to it. Always remember that you never want to use just the thin pad of this type because that would not offer enough protection to the horse.
It is important to line them both up, making sure that the nice clean pad is on top, covering all areas of the felt pad. Then after that, you are going to come and get the saddle, don't forget to make sure that all the parts are hooked up here on their safe keeper so they're not dragging, getting in your way and making it difficult to put this up. Your horse is going to move away, easily for you if you push her just to get enough room to clear.
As you place this saddle on her, you would want to try to do so, so that it's not going to come down hard on her. These saddles can be heavy, it takes a little bit of practice to get that little lift in it to put up there in a way that's easy on the horse. You will know that the placement is correct if you have got plenty of pad in front to protect her. You have got plenty in the back and it's pretty evened out.
After that, you are going to go to the other side and check to make sure that you're happy with it over here as well. Bring down the cinch straps both in the front and the back. Position the saddle just to make it a little bit more even on this side, make sure everything is lying flat free hanging.
Now you are ready to come back around safely going around, if you know your horse well, you should not be concerned so much about being away from her hind quarter. But remember that you would still want to do it in a quiet, safe manner. You are then going to go ahead and begin to cinch this horse up or tighten her girth. Start with the front girth first. You never want to have a horse with only a back girth in place because if she were to shake or move quickly, then this saddle rolled would be suspended scaring her and probably causing her to run off. Start by putting the cinch strap from the front to the back, continue to wrap it until it runs out of available strap. It is best to use the buckle system but most found out over the years working with students that if you buckle their saddle in, it is going to remain much tighter throughout the day.
Royal Champion is a horse information and supplements company that has a lot of tips and advice on how to take care of horses by using premium horse vitamin supplement in their daily diet.
By Ryan Ready
By Ryan Ready
Why Steel Toe Horse Riding Boots Are a Good Idea
If you have been unfortunate enough to have your horse carefully place his hoof onto your foot then you will know how much of an unpleasant experience it is! It is usual if you work with horses to assume that you will occasionally be trodden on. In other industries steel toe cap boots are mandatory where there is a hazard of damage to the feet, but this is not yet the case in the equine industry. This being said, there are a number of manufacturers who understand the importance of toe protection in horse riding boots and have begun to integrate this is into their products.
The truth is that steel toes inside horse riding boots are a sensible idea. It only takes a second to cause a painful injury which, if you are lucky, will only be a nice bruise that will be sore for a few days but could also result in fractured or broken toes. If horses are your livelihood, whether you work with or ride them, a foot injury can cause a very big problem. Trying to handle any horse whilst hopping around with a broken toe or fractured foot is at best difficult and at worst downright dangerous. Furthermore, it is likely that you will require a number of days out of the saddle, or at least on light riding duties as pressure of your feet in the stirrup is going to be painful or impossible. Also, a fracture to the foot could alter the weight distribution across it which will escalate to the entire limb, actually affecting your position in the saddle. If you ride horses for a living, consider the implications of having to take time off work due to such an injury and furthermore, think about the long term damage of a foot injury. Broken toes could become arthritic in later years, or suffer with poor circulation leading to discomfort when working outdoors in the winter.
If you are looking for boots with toe protection for wearing around horses, then it is advisable to buy a pair of boots that are specifically designed for horse riding. This is because there are some slight differences between traditional steel toe capped boots and those used for horse riding. Of course there are some obvious differences, and if you will be wearing your boots also for riding as well as yard work then it goes without saying that they must be horse riding boots. But even if you only intend to use the boots for working around horses, the horse riding boots with toe protection have been tested and designed specifically to withstand pressure of a horse. In particular, one of the main properties and differences is that such horse riding boots are tested to withstand pressure on soft ground, which traditional steel toe cap shoes don't. This means that when you are in the field and get trodden on, the sole of the shoe won't give way.
Overall, toe protection in horse riding boots is becoming more popular, and certainly the next time your horsey friend quietly stamps on your foot, you will be glad of the protection (or wish that you had it!). Whilst perhaps less necessary for people who only ride and do not handle horses, it is something worth considering for the others who deal with horses on a regular basis.
By Josie Amani
2011年2月14日星期一
Red Dot Sight - Reflects Red Light for Shooting Accuracy
A red dot sight is different from a laser sight. Whereas a laser actually emits a beam of light onto the target, a red dot will reflect an image onto the glass of the sight and then superimpose a dot onto the target. Typically, this type does not magnify the target in the lens, but merely sights the target. This type of sight can also be used with a telescope. The sights without magnification are usually installed on handguns, sub machine guns and shotguns for use at close range. This type offers a pretty good level of precision and accuracy.
How does the red dot work? It has a concave lens with a very thin metallic coating that reflects red light only. The red dot is a reflection of a light emitting diode inside the sight tube. When you look through the sight, a red dot appears as if it has been projected onto the target. The sight does not have pinpoint accuracy, but offers some level of assurance that you will hit your target by employing proper aiming and firing techniques. In addition, It can be adjusted up and down as needed.
There are several types of red dot sights. There is the full tube sight which looks very similar to the telescopic sight. This type is often employed with a shotgun. It comes with additional features and accessories such as haze reducing filters, sun shades, and flip-up lens covers. Open sights are also known as mini red dot sights because they are smaller and weigh less than the full tube sight. Because they are smaller, however, they often do not have accessories and options such as haze filters and sun shades. Small tube sights have the ability to accommodate haze filters and sun shades, but are smaller than full tube sights.
If you are considering purchasing this type of sight, then the experts recommend that you first take a look through the sight to make sure that you are comfortable with the way the sight works. Obviously, if you are color blind, you may not find it to be all that helpful in improving the accuracy of your aim. You should also consider what type of red dot sight works best for you depending on your shooting needs.
Keith Grable enjoys the outdoors, including hunting, shooting, fishing and just being outside. He is the owner of a website specializing in laser grips and sights primarily for handguns. If laser sighting is new to you, click on the link below for an informational DVD that you can download.How does the red dot work? It has a concave lens with a very thin metallic coating that reflects red light only. The red dot is a reflection of a light emitting diode inside the sight tube. When you look through the sight, a red dot appears as if it has been projected onto the target. The sight does not have pinpoint accuracy, but offers some level of assurance that you will hit your target by employing proper aiming and firing techniques. In addition, It can be adjusted up and down as needed.
There are several types of red dot sights. There is the full tube sight which looks very similar to the telescopic sight. This type is often employed with a shotgun. It comes with additional features and accessories such as haze reducing filters, sun shades, and flip-up lens covers. Open sights are also known as mini red dot sights because they are smaller and weigh less than the full tube sight. Because they are smaller, however, they often do not have accessories and options such as haze filters and sun shades. Small tube sights have the ability to accommodate haze filters and sun shades, but are smaller than full tube sights.
If you are considering purchasing this type of sight, then the experts recommend that you first take a look through the sight to make sure that you are comfortable with the way the sight works. Obviously, if you are color blind, you may not find it to be all that helpful in improving the accuracy of your aim. You should also consider what type of red dot sight works best for you depending on your shooting needs.
By Keith Grable
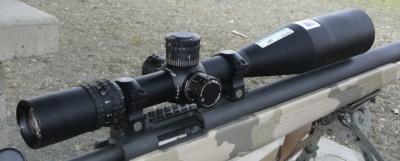
Rifle Scope
The rifle scope is the preferred method of big game hunters today, mostly used for turkey, deer, boar, and animals of similar size. The sports optics industry is a multimillion dollar business, and there are many choices available depending on the needs of the hunter.
Contrary to popular belief, scopes are not singularly advantageous over other methods of rifle sighting, such as iron sights and aperture sights. Scopes are notably slower than a peep site, and actually less accurate of a sports optic when close cover hunting. The main advantage of the rifle scope is its ease of use, because there is no sight alignment needed to use rifle scopes.
The first consideration when choosing a scope is the magnification to be used. Most rifle scopes have a range setting of between 3X - 9X magnification. Hunters like to use these to first make sure the animal is viable game (an adult buck, not a doe), then zero in for the perfect kill shot. However, there are fixed magnification sites available, with the advantage being there that the eye is not taxed nearly as hard, and hunters can stay in the game longer hunting equipment.
Also, note that not all scopes are made the same. Figure on spending US $250 for a good one, but the best cost well into the thousands of dollars. Cheaper scopes can be used for smaller game, like squirrels, but is definitely not recommended for larger game. Sightron is a leader in the industry and well known for the quality of rifle scopes it manufactures.
by Jordan Flask
2011年2月13日星期日
Choosing Saddles/Horse Tack for Safe Horse Handling
Providing the best care for a horse is not as simple a task as many may think. There are many aspects of safe horse handling that must be adhered to, including choosing saddles/horse tack. All of the particular supplies that one needs to care for a horse are important but knowing how to choose the proper horse tack and saddle means understanding the value of properly measuring for fits. When it comes to horse tack in English or Western varieties, the main difference is that English tack is a bit more complicated to use than Western. By definition, horse tack can include bridles, harnesses, lead ropes, cinches, martin angles, bridles, saddles, saddle pads, halters, breastplates and the girth.
Safe horse handling is more than a notion but less than trouble when choosing saddles/horse tack for the equestrian in question. A perfect match for the horse is a must and this match must be properly maintained which means that equipment must be fitted properly at the start and must be routinely checked for wear and tear as well as replaced when parts have worn down. Nothing is more dangerous than horse handling and riding on a horse that is outfitted with saddle/tack that is in poor condition. Danger exists for both rider and horse to experience injury.
No matter if the choice is the use of Western or English tack, everything a horse is outfitted with is important. Choosing saddles includes a wide range such as pleasure saddles which are used just for leisure riding, side saddles for proper ladies, roping saddles, jumping saddles, military saddles, training saddles and dressage saddles just to name a few. Choosing saddles/horse tack should be specific to the individual horse with regard to personality and temperament. A high spirited horse may fair better with nylon horse tack equipment where as an older mare may do well with leather tack, which is more expensive and requires higher maintenance than nylon but may serve a particular horse with excellence in fit and comfort.
Well fitting, safe tack is most essential for every horse. Using quality equipment means choosing saddles/horse tack that is reliable and built by trusted brands such as Requisite branded products. No matter if the search is for bridle work, bits, girths, irons or leathers and without regard to the budget or classes of use, you can gain access to proper saddles/horse tack and ensure that your horse is outfitted properly each time they leave the barn for training, riding or whatever the case.
Get essential stable supplies online by finding the horse saddles you need and a wide range of other equestrian supplies
The Selection of Saddles and Horse Tack
It is important to take your riding conditions, experience level, and passion into consideration when browsing the market for saddles and horse tack. There is no question about the importance of the saddle when it comes to horse riding. As one of the most incremental elements, rooting people to their horses and providing comfort and security, there is a lot of decision making when it comes to purchasing a saddle that you feel benefits you and your horse. The western saddle is one of the most popular saddle styles to invest in. making comfort, quality, and safety a priority is just the tip of the iceberg of what the western saddle embraces.
You are going to want to make your riding style a key deciding factor in choosing saddles and horse tack. People ride horses in a number of different ways and have varying amounts of equestrian experience, so it is often advised to seek professional help when setting out to purchase a saddle. Different saddles will work to position you differently on the horse. As an example, different saddles come in different weight and accommodate different assets. The western saddle focuses on fenders that prevent the straps from pinching your legs and also has an additional knob to hold on to while riding. The English saddle is more lightweight and possesses stirrups for your convenience and comfort, but they are lacking when it comes to fenders. You simply have to weigh out your personal choices and riding style before spending any of your hard earned money.
A significant amount of emphasis is placed on saddle selection; however, there are other factors to consider as well. There is a plethora of horse tack that is necessary for fully embracing an equestrian lifestyle. From stirrups, cinches, reins, the halters, harnesses, bridles, and other items, there are a lot of bases to cover. Although face to face, professional assistance with saddle and tack selection is recommended, another useful tool is the internet. The internet is rich with information on different brands of saddles and horse tack and also provides consumers with reviews and gives them exceptional insight into the equestrian lifestyle. No two people are alike, but no matter what your experience level is, what your budget is, or what your riding style entails, it has never been quite so simple to get your hands on the saddles and horse tack that best correspond to your desires.
There are plenty of horse saddles and other horse accessories available online, including riding wear to make sure you are protected and comfortable when riding.
by Kevin Longworth
2011年2月10日星期四
Developing Balance: Exercises
Relaxation and balance are the first two skills riders must develop as they work their way up the riding tree. In some ways, they are like that proverbial chicken and egg - which comes first? Without relaxation, it is hard for a rider to stay balanced over the horse. Without good balance, it is hard for a rider to relax. As balance improves, riders develop greater confidence that they are not going to fall off. That mental confidence, in turn, helps minimize the gripping and tension that pushes riders out of the saddle and contributes to being “off balance.”
Staying relaxed on the horse does not mean flopping around in the saddle with loose muscles. Balanced riders must develop a feel for where their body is positioned relative to the horse’s center of gravity (and they must be able to do this while looking straight ahead, not down). They also need to develop “muscle memory,” an unconscious tensing and releasing of the right muscles in just the right increments that enables them to maintain their equilibrium in motion at any gait or on any line they are riding without gripping with their legs or grabbing at the reins to stay on.
There are a number of exercises that riders can use to help themselves develop the “muscle memory” they need to stay in balance with their horses. These include:
I do not recommend riding with bareback pads to develop balance because they encourage gripping with the calves. A good saddle helps the rider sit correctly and riders must learn to sit correctly in a saddle for most competitions. So they want to learn to do this from the start.
Off-the-horse exercises can be extremely helpful in developing balance. Many people cannot stand or jump on one foot or do a simple squat without losing their balance. Any exercise that helps them develop balance on the ground will carry over into their work on the horse’s back.
Squats are a good balance exercise. Riders can start against a wall at first and move away as their strength builds. Eventually, they can work up to a one-legged squat with the other leg extended out in front of them. Trampoline work is also great for balance. Riders can cross train in any of the martial arts, yoga, ice skating, roller blading or any other exercise program or sport that challenges their balance.
Don’t be surprised to find yourself revisiting balance and relaxation issues over and over again as you gain riding experience. Just when you feel relaxed and balanced at one gait, the instructor introduces another and your old issues resurface. Just when you feel relaxed and balanced on one particular horse, you start riding one with completely different confirmation and gaits. Or you move outdoors after a winter of riding inside. Or you start riding on hilly trails after years of ring riding. As you steadily work toward the goal of achieving an independent seat, these changes will upset your balance and relaxation less and less. Just keep riding.
by Faith Meredith
Staying relaxed on the horse does not mean flopping around in the saddle with loose muscles. Balanced riders must develop a feel for where their body is positioned relative to the horse’s center of gravity (and they must be able to do this while looking straight ahead, not down). They also need to develop “muscle memory,” an unconscious tensing and releasing of the right muscles in just the right increments that enables them to maintain their equilibrium in motion at any gait or on any line they are riding without gripping with their legs or grabbing at the reins to stay on.
There are a number of exercises that riders can use to help themselves develop the “muscle memory” they need to stay in balance with their horses. These include:
- Frog position. Riders draw their knees up to help them find the middle of the saddle and to stay there without gripping with their calves.
- Dog position. Riders lift their thighs away from the saddle (like a dog lifting its leg) to help them find the center of the saddle without gripping with their thighs.
- Up two, down one. Instead of normal up-down posting to the horse’s two-beat trot, riders stay up for two beats, sit for one beat, and keep repeating this pattern. This constantly changes the diagonal that the riders are on and prevents them from using the rhythmic thrust of either hind leg as a crutch to maintain their balance.
- Riding without stirrups. Riders can work on this alone but they will achieve faster results if an instructor or knowledgeable riding partner puts their horse on a longe line so they can work without either stirrups or reins. Start at the walk (in both directions) and gradually work up to the trot and canter as balance improves.
I do not recommend riding with bareback pads to develop balance because they encourage gripping with the calves. A good saddle helps the rider sit correctly and riders must learn to sit correctly in a saddle for most competitions. So they want to learn to do this from the start.
Off-the-horse exercises can be extremely helpful in developing balance. Many people cannot stand or jump on one foot or do a simple squat without losing their balance. Any exercise that helps them develop balance on the ground will carry over into their work on the horse’s back.
Squats are a good balance exercise. Riders can start against a wall at first and move away as their strength builds. Eventually, they can work up to a one-legged squat with the other leg extended out in front of them. Trampoline work is also great for balance. Riders can cross train in any of the martial arts, yoga, ice skating, roller blading or any other exercise program or sport that challenges their balance.
Don’t be surprised to find yourself revisiting balance and relaxation issues over and over again as you gain riding experience. Just when you feel relaxed and balanced at one gait, the instructor introduces another and your old issues resurface. Just when you feel relaxed and balanced on one particular horse, you start riding one with completely different confirmation and gaits. Or you move outdoors after a winter of riding inside. Or you start riding on hilly trails after years of ring riding. As you steadily work toward the goal of achieving an independent seat, these changes will upset your balance and relaxation less and less. Just keep riding.
by Faith Meredith
Developing Balance: Using Your Horse’s Feedback
In order to work together harmoniously, both horse and rider need good balance. Riders who do not have a good sense of balance cannot follow a horse’s motion. Unbalanced riders tend to stay on a horse by gripping with their calves, gripping with their thighs, or hanging on the reins. Without good balance of their own, they interfere with the horse’s balance and, as a result, with its motion. Their ability to turn in a good, much less top, performance is severely compromised.
A rider mounted on an oldie goldie school horse or show ring packer can get away with riding off balance. That is why these horses are so prized by instructors. They are tolerant and patient by temperament and athletic enough to compensate for the rider’s faults. Their forgiving nature makes them wonderful as beginner’s mounts or for riders with confidence problems that make it hard for them to relax.
The green baby horse is another story. Even if he has incredibly good natural balance to begin with, any young horse just starting under saddle is going to have a lot of balance issues. He has to learn how to move all over again while carrying weight on his back. Depending on his training background up to that point and his temperament, the young horse may be apprehensive or confused. If his rider is confident, relaxed and has good balance, the horse’s first experiences will be positive. If the rider is unbalanced in any way, however, the young horse may become nervous or frightened. That’s just one of the many reasons why green horses and green riders are not a good match.
The trained older horse that is out of shape or the horse whose muscles are unevenly developed for whatever reason can also have balance issues until their fitness and muscling improves. Under an unbalanced rider, these horses may trip or stumble or develop more sore muscles than necessary as their conditioning program begins.
Understanding how the rider’s balance can affect the horse’s movement can give riders and their instructors important feedback. An off-balance rider typically:
Similarly, the rider who loses balance and falls forward closes that front door. The horse’s inclination to go forward is frustrated. If the horse feels blocked altogether he is likely to stop. These horses almost seem to be saying, “Get your act together if you expect me to carry you around.”
When a rider gets out of balance and shifts his or her weight on to the wrong seat bone, there are usually other things going on that affect balance, too. The rider may also be collapsing her ribs toward her hip. Or he may have let his shoulder move forward, effectively blocking any turn in that direction.
In all of these cases, the horse’s reaction is a clue to the rider’s balance issue. If your horse presents you with any of these reactions, pay closer attention to your own balance and body position before blaming the horse.
When riders first mount, they need to take a moment to position themselves correctly in the center of saddle before moving off. The upper body should be tall but not stiff. Be careful not to hollow the lower back. The rider should feel an equal amount of weight on both seat bones. The joints should all be loose and elastic. This allows the leg to drop and the hip joint to open up. From the side, there should be a plumb line from the rider’s ear through the elbow and hip to the ankle.
Everyone starts off with balance issues and they come up again and again as a rider advances. Use balance exercises both on and off the horse to help you progress and just keep riding.
by Faith Meredith
A rider mounted on an oldie goldie school horse or show ring packer can get away with riding off balance. That is why these horses are so prized by instructors. They are tolerant and patient by temperament and athletic enough to compensate for the rider’s faults. Their forgiving nature makes them wonderful as beginner’s mounts or for riders with confidence problems that make it hard for them to relax.
The green baby horse is another story. Even if he has incredibly good natural balance to begin with, any young horse just starting under saddle is going to have a lot of balance issues. He has to learn how to move all over again while carrying weight on his back. Depending on his training background up to that point and his temperament, the young horse may be apprehensive or confused. If his rider is confident, relaxed and has good balance, the horse’s first experiences will be positive. If the rider is unbalanced in any way, however, the young horse may become nervous or frightened. That’s just one of the many reasons why green horses and green riders are not a good match.
The trained older horse that is out of shape or the horse whose muscles are unevenly developed for whatever reason can also have balance issues until their fitness and muscling improves. Under an unbalanced rider, these horses may trip or stumble or develop more sore muscles than necessary as their conditioning program begins.
Understanding how the rider’s balance can affect the horse’s movement can give riders and their instructors important feedback. An off-balance rider typically:
- Falls behind the motion of the horse,
- Leans too far forward,
- Leans off to one side, or
- Shifts weight onto the wrong seat bone.
- Speeding up, shooting forward or even running away;
- Slowing down or even stopping;
- Turning or drifting when the rider intended to go straight;
- Turning more or less than the rider intended; or
- Turning in a different direction than the rider intended.
Similarly, the rider who loses balance and falls forward closes that front door. The horse’s inclination to go forward is frustrated. If the horse feels blocked altogether he is likely to stop. These horses almost seem to be saying, “Get your act together if you expect me to carry you around.”
When a rider gets out of balance and shifts his or her weight on to the wrong seat bone, there are usually other things going on that affect balance, too. The rider may also be collapsing her ribs toward her hip. Or he may have let his shoulder move forward, effectively blocking any turn in that direction.
In all of these cases, the horse’s reaction is a clue to the rider’s balance issue. If your horse presents you with any of these reactions, pay closer attention to your own balance and body position before blaming the horse.
When riders first mount, they need to take a moment to position themselves correctly in the center of saddle before moving off. The upper body should be tall but not stiff. Be careful not to hollow the lower back. The rider should feel an equal amount of weight on both seat bones. The joints should all be loose and elastic. This allows the leg to drop and the hip joint to open up. From the side, there should be a plumb line from the rider’s ear through the elbow and hip to the ankle.
Everyone starts off with balance issues and they come up again and again as a rider advances. Use balance exercises both on and off the horse to help you progress and just keep riding.
by Faith Meredith
2011年2月9日星期三
Things To Consider While Buying Your First Western Saddle
Riding a horse gives the rider immense pleasure and also has other boons like providing the riders agility and a regular workout. Riding a horse earlier was limited to people having farms or was a proud hobby for the riches. Nowadays the trend has changed and there are many ways you can fulfill the fantasy of becoming a cowboy in action. For an example there are number of clubs that provide the general population with riding lessons. These places are easily accessible for people living in crowded cities and are affordable. You can also be a part of a Polo training club and later on become a rider and a polo player. There are so many benefits of becoming a rider that one can only try becoming one and not think otherwise.
Although with all the above benefits of fitness and a developing a nice body balance, riding a horse only has one drawback that is it's too heavy on your pocket. Riding gives you pleasure and fitness but sometimes there are questions like whether the upkeep cost of a horse is worth the pleasure? The answer is that it is worth every penny you spend. Riding is not as expensive as it looks from far. Smart people can still enjoy it in nearly half the price that other non-smart people pay. Another aspect where people make mistake while spending on the horse is that they spend unwisely while buying the saddle.
The right saddle should be according to your requirement and your comfort. Most of the new riders never thinks about this aspect and rush into buying a saddle. Western saddles are great when it comes to comfort. Western saddles are the one popularized by most of the cowboy movies. Their seat is very comfortable and the look is very classy. English saddles are great when it comes to English horse riding discipline and in many equestrian sports. English saddles are made to endure the horse's movement while jumping and similar movements. Similarly there are many other saddles and each designed for a specific purpose. So it's you duty to understand your requirements and then buy a saddle.
Now the second issue to consider is how to get the best deal on the saddles you like. The American made saddles are very expensive compared to the one that are manufactured abroad. The American made Saddles for sale have different advantages of durability over their foreign counter-parts. The best advantage that Foreign made saddles have over American brands is that they provide the same look and comfort in very low prices. There exist some brands that have the same quality and durability and yet they charge you very less. So the best way to buy saddles is look for them on the Internet over e-stores like e-bay,amazon,etc.. and then buy them directly from the manufacturers.
by Lisa Smith
Why your child should ride horses
My daughter's trainer said to me "I know you would rather she have a tennis racquet in her hand, but she has this natural riding ability". Riding becomes a life long passion for some. It is one of the most expensive sports one might be involved in and it could be one of the most dangerous. This life sport impacts a child's physical, mental and emotional well-being. How fortunate the child or adult rider is who can have the privilege of cantering around a large, living animal.
I was once told, by a Horsie Dad, that sailing was more dangerous but I told him that he was wrong. Horseback riding is physically demanding from raising up the saddle to the withers and then to be doing the half seat in the ring. It improves coordination and balance. Few sports exercise or make demands, bilaterally, on the body. Horse back riding is one of the sports that does.
Emotionally, riding can build character. It makes a child be and feel more responsible. They are accountable for this huge 1000 pound breathing creature. They learn empathy for the friend who has just fallen off, or the one who missed the course at the show. They mentor younger kids around the barn and that builds self confidence. They exchange and interact with adults and this only serves to increase their social skills. They may learn to cope with the pressure of having all eyes on them while parents and siblings watch from the barn's fence or ringside at a competitive finals.
The riding lesson forces them to focus on riding basics. They are challenged to take risks. They meet new people and travel to new places.
Should they elect to compete at a schooling show or a rated show, they need to learn how to be a gracious loser. They may have to learn to handle disappointment or celebrate achieving a goal after committing themselves to work hard all year round.
They are lifting, riding, feeding, falling, eating, cleaning, mucking, traveling, getting up early, organizing themselves. It is different than soccer and field hockey and more like flying!
by Cathleen Marsh
2011年2月8日星期二
Rifle Scopes Reticles
A reticle is the pattern (which can vary) placed in the eyepiece of the scope which establishes the gun's position on the target. Reticles can be made from fine wire or etched into the glass itself. Reticles come in a wide variety of variations that range from simple traditional style crosshairs all the way to illuminated mil dots (short for military dot). Here are some examples of different reticles:
These represent a small sample of reticles that are currently available today. Some rifle scope manufacturers produce their own specialized reticles. The reticle in the image above marked as "Firefly®" is a specialized illuminated model produced by Bushnell®.
In the grand scheme of things reticles probably won't play a huge role in your scope selection decision, but it can be important. Make sure you choose a reticle that works your specific type of shooting. For long range shooting or hunting (+400 yards) or long range competitive shooting, consider a reticle without a dot.
At longer ranges with small targets, the dot can actually cover up the target. A good friend of mine hunts prarie dogs at long range and purchased a very expensive scope with a mil-dot reticle. At long ranges, he found that the reticle dot was actually larger than the prairie dogs and covered them up.
extract from: www.rifle-scope-guide.com
Nightforce Scopes
Nightforce Optics was found in 1992 and is based in Orifino, Idaho. Unlike most rifle scope manufacturers, Nightforce entered the riflescope market in a somewhat unique way.
In 1992, Nightforce set out to build the best rifle scope on the market. Instead of entering the market with an affordable line of scopes to build a customer base, Nightforce jumped right into the high end precision shooting market.
Their approach was to build a top of the line scope from the ground up using the best materials and workmanship. Each scope is basically hand assembled in the Idaho production facility. Before the scope even makes it to the testing and quality control phase of production, it has to pass a rigorous 70 point checklist. After that each scope is hand checked for craftsmanship and performance.
Nightforce utilizes some of the most grueling quality control measures that exist in the rifle scope market. If a part or component is off by so much as 1/30th of an inch (about the width of a eyelash), it's deemed to be defective. This commitment to quality has quickly moved Nightforce to the forefront of precision rifle scopes.
When the company first started producing scopes, they were designed to target the needs of military special forces and law enforcement SWAT agencies who needed the most dependable and best performing rifle scope they could afford. Over time, the company has added additional rifle scope models that are designed for other uses like long range hunting and competitive benchrest shooting.

The Nightforce line is really designed for the serious shooter, military or law enforcement professional, or serious hunter. It's not priced or produced for the weekend hunter.
Just to give you some idea of the quality and accuracy associated with a Nightforce scope, there are a number of existing world record scores in precision long range shooting that were done with a Nightforce; including several world records in .50 B.M.G. 1000 yard benchrest.
Having had the chance to own and shoot a Nightforce myself, I can tell you that they are nothing short of amazing. Once you try one, I almost guarantee you will want one. They certainly aren't cheap, but are one of the most well built scopes I've ever seen. With Nightforce, you aren't buying a name, you are buying performance.
Here are a couple of Nightforce scopes that are currently for sale. If you don't see the model you are looking for, please consider using our "Search" function on the upper right side of the page.
extract from: www.rifle-scope-guide.com
2011年1月29日星期六
The Key Aspects of Good Horse Care/Maintenance
Horses need to live in a safe environment, but it is not all about just feeding them and giving them shelter. You must consider your horse as a sensitive animal that would react to its conditions, and needs specific care in order to live a long and healthy life.
Here is a check list of the different aspects to cover, in order to help you to provide your horse with the best possible horse care/maintenance.
1. Living space, the barns, or stables, must be clean daily to avoid contamination. Also the horse needs room to exercise, so open spaces are a must. Some owners that don't own them can rent areas for horses to exercise.
2. Feeding, it is recommended that the horse feed two or three times a day, instead of having just one big meal, unless it is on permanent pastures. Food can vary from grass, hey, concentrate grains, to the famous pellets, which are a combination of grains and supplements that can make life easier for some owners, by helping them to provide the horse with a high nutritional value meals.
3. Protection from the elements, some horses might need more help than others getting by the winter, or dealing with the heat of summer. This is why you can use the help of specially designed sheets to either cool or warm your horse.
4. Grooming, regularly groomed horses have healthier and better looking coats, the key is in getting the right grooming tools for your horse's coat. This is a great way to gain your horse's trust, and it should be done as often as possible, especially before a riding trip. By doing this you can check for injuries or dirt, and is a good sign of proper horse care/maintenance.
5. Health, your horse should have regular veterinary checkups, and be given supplements or vitamins when necessary. You must supervise all aspects of your horse's health, and that includes dental care and parasite control. Also it is essential to count with a first Aid kit.
These are the 5 areas that cover most of your horse's life, if you can manage these areas properly, than you are doing things right in horse care/ maintenance to provide a happy and full life. Each area requires close attention and dedication, but only proper care is the only way to have a healthy, happy horse, that you can ride for years and years to come.
Care for your horse by getting the essential items you'll need such as equestrian equipment like horse rugs.
by: Phil Adams-Wright
5 Tips to Ensure Horse Riding Safety
There is almost nothing as good, as the marvellous feeling of freedom that riding a horse provides, the reconnection with nature, the speed, or the calmness, the smell of fresh air, and the partnership with such a majestic animal, make horse riding an amazing experience. But, if you don't take the necessary measures to ensure horse riding safety you can be in a lot of trouble.
The following five tips can help you to avoid unnecessary problems and accidents when horse riding.
1. Check your horse's saddle/horse tack before leaving the stables. Check for tearing, make sure the horse is comfortable, that everything fits, and that everything is where it should be. A happy horse is the best way to horse riding safety.
2. Check your own clothing, don't even try to go out riding without the proper helmet, or equipment. And check the good state of these as well, because a cracking helmet won't be of help if you were to fall.
3. Emergency and first aid kit, if something was to happen make sure you have some first aid kit with you, for both you and the horse. Also phone numbers, not just your doctors, but also the veterinarian's.
4. Don't try tricks you don't know when out on a horse, just relax and do what you can do, even if it means just sitting and letting the horse walk. Don't rush a horse if you don't know how to control it yet. And in this case don't go out riding on your own, because horses can be unpredictable creatures especially if ridden by inexperience riders.
5. Know your surroundings, don't adventure into an unknown area with your horse, believe it or not, they also get scared and are very sensitive to their environment. So explore the place you want to go to without the horse first, and don't force the horse to terrains that are to new for it.
These simple tips, along with other basic rules, like only riding a well rested and calm horse, are the golden rules of horse riding safety. You and your horse can enjoy a great riding day if you take proper precautions and know what you are doing.
Just remember that you are the only one who can take care of yourself both before the ride, and once on the horse you will have to trust each other, which reminds me, don't ever ride an animal you don't trust, because it won't trust you either.
Various stable supplies are essential to the safety of you and your horse including equestrian boots and riding helmets, buy them online to make sure that you are safe when riding.
by: Phil Adams-Wright
2011年1月26日星期三
8 Tips to Remember When Buying Hunting Binoculars
When you go out to buy a set of binoculars, it is always best to know what you are going to use them for. Hunting binoculars will have different features than a pair of birding binoculars or marine binoculars. The best binoculars for hunting are not the same as the best binoculars for watching a ball game. You must choose wisely, know the features that will best suit your interests and know what your price range is. You can buy binoculars for $19.95 or you can buy them for $1995.00, it’s all up to you. But the binoculars that are $19.95 aren’t going to be better than the binoculars which cost more. You usually get what you pay for.
Here are a few tips to remember when buying hunting binoculars.
The overall aim is to prepare you for the task of finding the right pair of binoculars, at the right price, without compromising on features that you may require.
Eight Hunting Binocular Tips
- Hunting binoculars should be rugged. You don’t want a binocular that will break or be destroyed by water. Try to get a pair that is armour coated with rubber, is waterproof and fog proof.
- A good hunting binocular needs to have good light gathering ability. Many hunters hunt at the break of dawn or at sunset, when the light isn’t as good as it is during the day. A good pair of binoculars can help with this problem. The most popular binoculars for hunters are sizes 8 X 40 – 42 or 10X40 – 42, because of their good magnification power and light gathering ability.
- The weight of the binocular should concern you. When hunting, you will carry around your binoculars with you, sometimes for hours. You don’t want to carry around a set of binoculars that weigh a ton.
- Cost is always a concern—unless you’re fabulously rich. You should always spend as much money on hunting binoculars as you can afford. The cheaper the binocular, the cheaper the manufacturing costs, the cheaper the overall product. You want your binoculars to last for years, not days.
- Do you want a laser rangefinder? Some binoculars come with a laser range finder. This gadget makes it possible to shoot a laser at your target, and calculate the distance. Just remember, that a binocular equipped with a range finder, will probably cost much more than a binocular without it.
- Ask questions and be informed. Make sure you check out some binocular reviews and that you ask the salespeople pertinent questions. Know your stuff, before you walk into the store.
- Binocular accessories are always a plus. Make sure you know what binocular accessories you want, or need, before going to the store to buy. For example, if you know you’ll need a binocular strap, make sure the binocular you buy comes equipped with one.
- Warranties are important. Make sure that you can bring the binoculars back, if they don’t suit your needs. Testing your hunting binoculars in the store is a hell of a lot different than testing them in the field. Also, try to buy binoculars that have a manufacturer’s warranty.
More Info . . .
Remember, that the best binoculars for hunting depend on what animal you will be hunting. Binoculars for deer hunting might not be the best for hunting rabbits.
Take the time to do the research; it could save you hundreds of dollars. Know what you want before you enter the binocular store, and that way you will be able to ask very direct questions and the salespeople will be able to help you better. Not only that, but it limits the chances of getting ripped off.
Ask hunters what binoculars they use. Their insight can be invaluable. After all, they hunt all of the time!
by: Scott Gray
The advantages of the spotting scope over binoculars
For an avid hunter, his hunting equipment can make the difference between a hit and a miss; a prize catch or a missed trophy animal that missed you by a few yards! Small wonder then that spotting scopes are fast gaining popularity among regular outdoors enthusiasts. A spotting scope is a compact telescope designed largely for terrestrial observing and is used in applications that involve magnifications beyond the range of a typical binocular. Compact and powerful, these optical instruments ensure that you are spot on - always!
There are many instances when a pair of usual 7x to 10x binoculars can be inadequate either because of lack of magnification or clarity. This is where a spotting scope comes in handy. Spotting scopes offer more magnification than binoculars and can help you locate targets at extreme distances that can be missed by observers with binoculars. Generally sold with zoom type eyepieces in either 15-45x or 20-60x magnifications and used with a tripod for stability, these will allow you to identify or observe animals at distances beyond the reach of your binoculars.
Uses of spotting scopes
Spotting scopes are perfectly suited for activities like hunting, long distance bird watching and nature study, telephotography, scenic observing, long distance microscopy, beginning astronomy and surveillance. Depending on the type and design of the spotting scope, the magnification can range from about 10X to 250X, using either fixed or zoom eyepieces. Whether you use it to identify a game buck at long range, observe migrating crane in the winters or spot bullet groups at the range, a spotting scope will augment your pleasure in the outdoors.
Types of spotting scopes
In addition to magnification, spotting scopes can also vary depending upon their design. There are two basic body designs - straight and angled. With straight scopes, the barrel and the eyepiece are parallel, while in angled scopes the eyepiece is 45º from the barrel axis so as to bend the light path. Each design has its own pros and cons and the choice of scope boils down to how you want to use it. Here are the advantages of each design:
Angled Spotting Scope
- Easier to share with a group
- Higher eye point means you can use a shorter tripod
- Better for spotting tree top or hiding animals.
Straight Spotting Scope
- Easier to aim for beginners
- Easier for viewing animals on the ground.
- Less strain on your neck for level viewing
Advantages of using spotting scopes
Though there are many advantages of spotting scopes over binoculars, one of the primary one is that a scope allows you to observe sensitive species such as deer and bucks from friendly distances. As more and more people take to the field, it is becoming increasingly important to watch in ways that are minimally disruptive and stressful to wildlife. The magnification of spotting scopes allows you to do that and makes scopes ideal for any nature activity in wild!
Finding an animal in a large herd
Imagine locating a Golden Lion Tamarin sucking on his mother among thousands of animals in the wild or the Black Buck nestled among thousands of deer and other wild animals! Finding it using binoculars is can be a trying task, and there's no guarantee that you might finally be able to see it at all. But with a spotting scope, simply by virtue of its higher magnification, you can easily spot the elusive animal. Chasing rarities with these scopes is a pleasure!
Locate an animal in its hiding place
Some animals visit certain places only for a few hours or days in a year and are often on the move. Never staying still they are constantly pushing ardent hunters and nature watchers to the edge. Equipped with spotting scopes, you can spot a movement on the ground or air, from even as far as 200-300 yards away, and capture that mysterious animal in your scope, before it runs away, never to be seen for a long time.
Distinguish between similar species
The simplest way to spot different species of animals in the wild is by some color distinctions. However on a dark, overcast day, when the colors are nonexistent, poor lighting means that you will be not be able to spot the differences without close proximity. A spotting scope with its clarity and magnification can make this assignment successful and memorable. You can observe the animals without getting too close to scare them away!
Identifying look-alike animals
Distinguishing between look-alike animals can be a daunting task, especially for newer wildlife enthusiasts. Sometimes different species have such similar coloration and patterns that's it is absolutely essential to zoom to the closest possible frame to make the distinction. And once again, spotting scopes have a definite edge over binoculars. With unbelievable clarity, scopes offer much better results than binoculars!
In other words, spotting scopes can help you spot a an animal in a large group, trace where it is hiding, spot distant animals, distinguish between similar species, and identify look-alike animals. In addition, spotting scopes can also be used for recording images and not just plain viewing. One of the most popular uses of spotting scopes in addition to spotting is telephotography.
Telephotography
We all love bright, high-contrast images with true-to-life colors. To capture your sightings for years, nowadays most models of spotting scopes offer the capability to use the spotting scope lens as a telephoto lens. The optical design and configuration of the scope and the available accessories determine its performance and effectiveness for this purpose. As opposed to a camera telephoto lens, spotting scopes usually operate at much higher magnifications and at a fixed aperture or f/number, and need more stability and a higher speed film plus slower shutter speed options for correct exposure.
Digiscoping
Imagine capturing wildlife in its purest form, and being able to save it for later viewing! Now you can - digiscoping is here. Defined as a spotting scope with a digital imaging system, this remarkable spotting scope has a built-in imaging system and optical beam splitter for simultaneous visual and electronic monitoring. All images are output to a standard RGB signal that lets you view images on a TV, camcorder, computer, LCD viewing screen or a digital camera in amazing detail. Simply put, digiscoping is perfect for recording list birds or tracking the trophy elk you've been pursuing for years.
Though spotting scopes have many advantages over binoculars, yet some hunters avoid spotting scopes because they find these more complex to use than binoculars. Scopes do offer a higher magnification but at the cost of the field of view. Plus, the discomfort of one-eyed observing can make them a little difficult to use at first. But with a little practice all these obstacles can be mastered. Any hunter who can use binoculars can learn to use a spotting scope and trust us, the catch will be worth it!
TIP: Generally, the best way to use a spotting scope while hunting is as a back up to your binoculars. Use the binoculars to find game, and the scope to identify what you've found but cant make out clearly. Try not to use your scope as your primary glassing tool since this may tire you out too soon, especially if you are a novice. Remember when using your scope, it's much easier to initially find things in the image by turning the power down to its lowest point and using the widest possible field of view.
Picking the right spotting scope
A spotting scope is a sure way to open new hunting opportunities for you. Whether you observe in the great wide open or locally at your city park, a spotting scope will add a new dimension to your game. If you anticipate any field use of the scope, investing in a waterproof scope would save you a lot of hassle. Hardcore hunters also appreciate strong construction and preferably nitrogen filled optics so they won't fog up.
Plus, always remember that usability is equally important in spotting scopes. A good spotting scope should live up to the elements but it shouldn't be too heavy to carry. Furthermore, it should be easy to focus and usable on a car window mount, for those times when you dare not step out of the vehicle and disturb the natural world. Built-in, slide-out sunshades and easy-to-use lens caps will also help a lot. Last but not least, a good scope needs a good tripod to help you keep steady.
There is no doubt that with spotting scopes, magnifying is perfected. Spotting scopes have mastered the task of bringing distant objects closer and even storing them as photographs or digital images. Not only do they range widely in capability and price, but also offer more steadiness and clarity than a binocular with the style of a telescope. Here's wishing you lots of amazing and extraordinary sightings with yours!
by: Garima Sharma
About the Author:
Garima Sharma is a successful freelance writer offering guidance and suggestions for consumers regarding binoculars, rifle scopes, spotting scopes. Her many articles give information and tips to help people save money and make smarter decisions.
2011年1月25日星期二
The Horse Whisperer In You
Is there a Horse Whisperer in you? According to Wikipedia, the free encyclopedia, the definition of a Horse Whisperer is a horse handler who adopts a sympathetic view of the motives, needs, and desires of the horse, based on natural horsemanship and modern equine psychology.
Body language is a great communicator between the horse and the handler. Horses use ear and head positions, showing of teeth, swinging of hips and speed of movement to communicate. Recognizing the signs of fear or threat to build trust between the horse and the handler is vital to communication.
Horse Whisperers understand that fear, pain and distrust do not result in a relationship that will benefit the horse or the handler. After all, the object is for the horse to be calm and feel safe throughout the training process. A horse that feels safe will bond with the handler and the results can be remarkable.
Whenever I hear the term "Horse Whisperer", I first think of my grandfather who was well known for his unique ability with horses especially those considered difficult, dangerous or at times, ready for shipment to the glue factory. I used to watch him from a distance as he approached each new arrival facing the magnificent animal with calmness, patience, and great presence.
He always began the introduction by slowly walking around the small coral never turning his back from the horse. His steps were equally paced and his eyes were locked in with those of the horse. I watched as the horse turned to face my grandfather and was always a gasp away as I wondered if horse would charge.
When a horse would become uncomfortable or seem to begin a charge, my grandfather would hold his ground and stand still facing the animal with quiet strength and resolve and eventually the horse would calm and the dance between the two would begin again.
The second phase of training began by encouraging the horse to run away as my grandfather made loud noises and large flapping hand movements. This seemed an odd way to build on the trust they had developed but my grandfather explained he was giving the horse the choice to flee or follow. Unlike most traditional horse training techniques where the trainer demands that the horse be subservient, my grandfather was giving the horse a choice.
The training was complete when my grandfather turned his back on the horse and, through body language alone, invited the animal to follow. To my amazement,equine, the horse would follow - head down - slowly inching toward my grandfather in quiet submission. This act was proof that the horse somehow understood my grandfather�s intentions were not to harm him but rather to communicate.
My grandfather would later teach me many important lessons over the years but his horse training techniques taught me at a very young age that through kindness and the sincere desire to understand the needs of another we can develop and nurture a relationship with animals as well as each other. Now you may wonder, Western Bits, how can I develop these techniques for myself? In order to create the proper training environment between yourself and the horse, I recommend the following:
� Adopt a sympathetic view of the motives, needs, and desires of the horse.
� Use and interpret body language to communicate.
� Establish eye contact with the horse.
� Approach the horse with calmness, patience, and great presence.
� Recognize the signs of fear and threat to build trust between the horse and you.
� In the face of adversity hold your ground with quiet strength and resolve.
� Give the horse the choice to flee or follow.
Tree Stand Safety
One of the best advantages a hunter can get when hunting whitetail deer is doing so from an elevated position. In most hunting scenarios, to achieve this elevated height, it is easiest to do so with a tree stand. Modern tree stands are very safe when used the proper way. Follow all manufactures guidelines on care and upkeep of your tree stand. Failure to do so can result in serious injury or death. To help prevent injury from tree stand accidents, follow these safety guidelines.
Get familiar with your equipment
Read and follow all factory recommended procedures concerning your tree stand. Practice using your stand on a tree close to the ground to help you to become more comfortable with the mechanics and functions of the stand. I always keep all related safety equipment in a bag attached to the stand. You do not want to make it to your hunting spot before you realize you have left key safety parts behind. It is in times like these that hunters decide to skip key safety steps. The decision to hunt unsafe might just be your last.
Always use your safety equipment
Use a safety harness when hunting from elevated tree stands. Again read and follow all recommended procedures. Never use a rope to replace your safety belt portion that is attached to the tree. I recommend a full body harness. In the event of a fall while wearing a full body harness your body will be facing straight up. If you are properly attached to the tree you would only fall 8 to 10 inches. This will allow you to easily pull yourself back up onto your stand.
Never carry equipment with you while climbing
Use a haul line to raise or lower your gear. Make sure guns and crossbows are unloaded before raising or lowering them from the ground. Make sure your haul line is sturdy enough to withstand the weight of a gun, crossbow, and any other gear you plan to pull up to your stand.
Check permanent tree stands every year before hunting
Do not use homemade tree stands. These stands are not only difficult to move when deer change their trails, but these stands often deteriorate quickly and often are unsafe even when newly installed. Remember that weakened wooden steps and stands can kill and cripple hunters. Even pressure treated wood gets slippery overtime. Read and understand recommended procedures when installing commercial stands. Straps or chains sometimes are recommended to be changed in as little as 12 months of use. When installing never put all your weight on a single branch. Keep at least one hand and one foot on a secure place when reaching for the next hold. Climb higher than the stand and step down onto it. Climbing up onto it can dislodge it and cause accidents. Each time you hunt from a permanent stand make a visual check to confirm everything is in its place.
Know the Rules
On public land in most states it is illegal to place nails or other hardware into trees, or to build permanent structures, such as tree stands, platforms and blinds. On private land always get the landowners permission before you cut limbs, remove trees or alter their landscape in any way.
Check portable tree stands before hunting
Inspect portable stands for loose nuts and bolts before each use. Make sure to choose only healthy, living trees when using climbing devices. Rough-barked trees are always best. It gives the teeth and straps on your stand something to grab onto. Do not use a tree that is rotten or has dead limbs. Don’t go too high. The likelihood of a serious injury escalates if you fall from high up. Usually, 15 to 20 feet is high enough to give the hunter an advantage above the whitetails line of sight.
Use updated equipment
You might save a few bucks on an older used tree stand but you are putting your health at risk. Tree stand equipment manufactured today is solid, safe and secure. The $50 you save on a harness or stand will not help you much when it comes to calculating your hospital or burial expenses.
Plan ahead
Tell a dependable person where you’re hunting and when you plan to return. Map your whereabouts and leave a note at camp, at home or in your vehicle so that you can be found in case of an emergency. If your like me you already carry enough equipment into the woods. But i also think it would be wise to have a whistle, first aid kit, good flashlight and cell phone just in case of an emergency situation.
A successful hunt always coincides with a safe hunt. Safety should be your number one priority when going on a hunting trip. Always remember safety first.
extract from: www.deerhuntersclub.com
2011年1月24日星期一
Selecting The Right Guide Outfitter For Your Hunt
If you wish to experience a successful hunting trip, you must plan in advance. Before anything else, you need to decide the type of game you intend to go pursue i.e. bear, caribou, deer, antelope, moose, or elk . Your preparations should include researching areas where you intend to hunt for your trophy animal. Your plan must include applying for and obtaining the necessary permits in time. However, none of this relieves you from the all-important task of selecting the right outfitter for your hunting trip, which is a daunting task in itself.
If you hear people say that an outfitted trip is meant only for the unskilled hunter, do not let it deter you from seeking out a good outfitter. Hiring a professional outfitter/guide can simplify your preparations and enable you to gain access to prime hunting areas and new vistas of outdoor adventure that may never have opened had it not been for the professional operator.
However, you must be circumspect in your selection of the outfitter. The Internet can be a great resource to provide you with credible information about many reputed outfitters, most of whom maintain a presence on the web. Begin your search by using the name of the region/area you prefer for your hunt and the particular species of game as keywords. Do not be swayed by the grandeur of a website. The quality of the outfitter may not match the quality of the site. You may also try contacting a hunting consultant or booking agent as they are more commonly referred to. Booking agents usually have booths at sportsman's shows or can be found by making a web search. As they promote a number of outfitters, you have a better chance of making a comprehensive survey of what different outfitters have on offer and select a good one, to fit your needs and budget. It will increase your expenses though, because booking agent commissions will also come out of your hunting fee.
Once you decide on an outfitter you will then need to contact him. Your initial contact will get you the most important information if you speak to the hunt operator directly. When you manage to talk to the right person, make sure to ask about all that is provided against the price you will pay; whether it covers accommodation, meals, equipment, transport, travel etc. What is the mode of transport involved in the trip such as planes, boats, all wheel drive vehicles, trucks etc. and whether the fees cover expediting relevant licenses or not.
The next thing to ask about is the size of their operations i.e. how many clients the outfitter helps every year. Checking success ratios can be advantageous in choosing the right outfitter. However, many present twisted statistics to support their sales pitch. There are some who term a wounded animal as a success. Ask for several client references checking for successful hunters and speak to them. This will provide a much clearer picture of the real success rates and the quality of services of an outfitter. It is also important to ask outfitters about the length of time that they have been in business and whether there has been anything that can be termed as a serious problem in their dealings with clients.
Although every businessperson would say their services are the best, be sure to ask what service you should expect when you make a booking with them. Make a note of the details and check if they have a brochure. Ask the outfitter to send you one along with any other additional information he may have with respect to preparations for the hunt. Many outfitters will send you a kit that has a lot of useful information after you book with them. Compare its contents with whatever information was given to you during the conversation.
Getting the right outfitter is crucial to the success of your hunt. Take care to select the best one for an enjoyable hunting trip.
by Justin Ott
Hunting Equipment Tips and Tricks
Binoculars - One of the most important pieces of equipment a hunter needs while on a hunting trip. A person who spends a great deal of time outdoors definitely needs to have a good pair of binoculars. Hunting binoculars are made for hunters who hunt in the highlands or in the bush, giving them a great advantage to spot, stalk and shoot the animal.
Unlike a telescope, binoculars give users a three-dimensional image adding perception of depth while viewing distant objects magnified many times over. Essentially there are two types of binoculars Porro prism and Roof prism. Porro prism binoculars are wide, the objective lenses are well separated, but off center from the eyepiece.
Roof prism binoculars have objective lenses that are more or less aligned with the eyepieces. They are more compact, narrow, and costlier than Porro prisms binoculars. Major European optical manufacturers like Leica, Zeiss and Swarovski manufacture only roof prism binoculars.
Optical parameters
Magnification in layman term is the magnifying power of the binocular: e.g. in an 8 x 40 binocular. The figure (8) indicates the magnifying power. This means the object is magnified by 8x, so that the object appears eight times nearer than it actually is. The figure (40) indicates the width of the objective lens at the far end measured in millimeters. A wider lens will admit more light into the binocular, resulting in a brighter image than a 8 x 20 model.
Magnification in layman term is the magnifying power of the binocular: e.g. in an 8 x 40 binocular. The figure (8) indicates the magnifying power. This means the object is magnified by 8x, so that the object appears eight times nearer than it actually is. The figure (40) indicates the width of the objective lens at the far end measured in millimeters. A wider lens will admit more light into the binocular, resulting in a brighter image than a 8 x 20 model.
Exit pupil diameter or EPD: Exit pupil diameter is amount of light that rea
ches the eye. It is calculated by dividing the diameter of the lens at the far end by the magnification, so in this case the EPD is 5. During dawn and dusk binoculars with a higher EPD are recommended and in bright sunlight a lower EPD binocular is advisable.
Prisms: Porro prism binoculars are bulkier and heavier than Roof prism binoculars, which are more compact, smaller and lighter.
Objective lens Magnifying lens of a binocular is coated to reduce the loss of light and also to reduce the glare. There are four types of coating available.
Coated: The surface of lens at the far end is coated with a single layer.
Fully coated: A single layer of coating is on all air to glass surfaces.
Multi-coated: the lens on the far end has multiple layers of coatings.
Fully Multi-coated: All air to glass surfaces have multiple layers of coat.
Field of view: It is the width of the panoramic view when observed from 1000 yards or 1000 meters. It is also expressed in an angular value as to how many degrees can be viewed. For looking at objects that are smaller a narrower field of view is preferred and when scanning a landscape a wider field of vision is preferred.
Focus
Some binoculars have focus preset to infinity and adjustments are not required the focus range will be 20meters to infinity. However to observe objects at shorter distances manual focus are used.
Specialty binoculars
Major American and European manufacturers like Nikon, Bushnell, Leupold, Leica, Zeiss, and Swarovski have a product range of Hunting Binoculars, Military Binoculars, Opera Glasses, Astronomy Binoculars, Marine Binoculars and Birding Binoculars, optics planet.
Hunting Binoculars
There is a vast range of various hunting binoculars available in the market today. Many of the best hunting binoculars manufactured by both the American and European manufacturers can be found in stores that specialize in hunting gear or outdoor equipment. Hunting binoculars come with a number of features that are ideal for various forms of hunting.
There is a vast range of various hunting binoculars available in the market today. Many of the best hunting binoculars manufactured by both the American and European manufacturers can be found in stores that specialize in hunting gear or outdoor equipment. Hunting binoculars come with a number of features that are ideal for various forms of hunting.
Some of the features available on hunting binoculars include a range finder like the Leica Geovid binoculars. A range finder in the binocular allows the hunter to range the distance between him and the animal he is hunting. Most hunters consider a range finder to be a critical piece of equipment. A range finder works by sending out a laser beam to the object, which then bounces off the object and is then sent back to the range finder Visionking telescope binoculars. The range finder binoculars have a micro-processing chip inside that calculates the distance between the viewer and the object.
Weight of the binocular is also important as the roof prism binoculars are lighter and can be held for longer durations without any strain on the arms. Tripods are also recommended when observing for longer durations.
Rubber armoring protects binoculars from bangs. Reading hunting binocular reviews will help in making the right decision about the type of binocular needed for your outdoor trip.
by Justin Ott
订阅:
评论 (Atom)